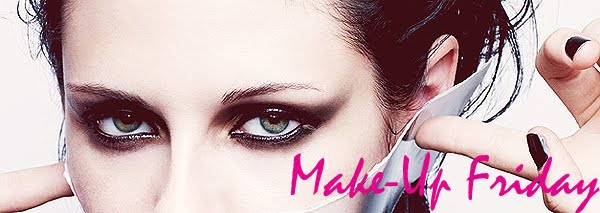
Welcome! This post took a little longer because i've hijacked someone elses laptop (shhhh don't tell them). So this week sees the wonderful @kstewmakeup doing the Elle 2007 photoshoot look. Loved this look i've always wondered how to achieve the lined eye look.
I just want to quickly say here that i have been posting the Flaunt magazine looks over on twitter. I'm waiting until i have the full spread before i do a post for it here, it will be epic and oh so worth the wait, trust me?
As always thank you to my fantastic bestie @kstewmakeup for doing this tutorial! Her follow button is on the sidebar and shes as cute as pie so go say hello to her if you have any questions about the tutorials.
Lastly last week you guys voted for the EW photoshoot as your Kristen birthday tutorial. Some of you sent pictures and they are included in the video. I've also posted them below the Elle tutorial because i love you followers and appreciate the you sending me them (seriously hearting you guys today). So go to the bottom of the post if you want to have a sneak peek at the EW tutorial pictures you guys sent me.
NOTE: For tutorials you do not need the exact make up @Jacksonville25 uses, similar colours from any brand you feel comfortable using will do.


Elle 2007 Photoshoot Tutorial
Elle 2007 Photo Shoot How To
Things you’ll need
Aapri Dual Cleansing Exfoliating Pillows: http://www.aapri.co.uk/pages/pillows.html
Nivea Visage Natural Beauty Radiance Boosting Moisturiser
UD Complexion Primer Potion: Brightening
L’Oreal True Match Foundation: N1 Ivory
Rimmel London Stay Matte Pressed Powder: 003 Peach Glow
UD Shadow Primer Potion
Maxfactor Earth Spirits: 101 Pale Pebble
Rimmel London Exaggerate Waterproof Eye Definer: 261 Noir
Bourjois Paris Liner Stylo: 41 Noir
Maxfactor False Lash Effect Mascara: Black
Maybelline New York The Falsies Volum’ Express Mascara: Black
Face
Usual steps for the face. Exfoliate using the amazing Aapri pads, rinse, then moisturise. Wait a for about five minutes to let the moisturiser sink in. when that’s done, apply the primer to you cheeks, nose & chin. Be careful to avoid the eye lid or area as you don’t need facial primer here. Then apply your foundation & powder.
Eyes
First, apply your shadow primer. For the eye shadow, use a colour which is as close to your natural skin tone as possible. Although I used a Maxfactor single colour, I wasn’t too happy with how it applied. I had to apply tonnes with a brush just to get a good look. Despite it being Maxfactor, I wouldn’t recommend it. Apply the shadow over your eyelids top and bottom and right up to the brow bone. Next is the eyeliner. This is a vital step and the highlight of the look. For this I used two liners because the waterproof liner has more substance to it and stays on for longer and looks great, however, you need this look to be strong so you must apply eyeliner on your waterline too. For this waterproof eye liners are no good. For the waterlines I used the Bourjois eye liner which worked great. Apply that in your waterlines to start off with. Then using the waterproof eyeliner, apply it to the entire eye, making sure to steer clear of the inner corner on the top lid.
For your eyebrows, you want the quite thick so brush your brows out and add a natural colour if you want. In this shoot, Kristen has her natural shade of eye brow so not much colour is needed. Next apply your mascara and you’re done with the look!
Thanks for watching and reading. I hope you enjoyed it.
A special thanks to Catlin, @ellie_jaymesx, @letmekstew & @amzzRP for sending in their pictures, and of course @Kstewfashion, for without her Make Up Fridays would not be in existence. Thanks to all my followers, fans & subscribers, your support means the world to me. xxx
EW Tutorial Pictures from readers

@ellie_jaymesx


@letmekstew


@amzzRP


Catlin


1 comments:
I would love to know whuch lipstick she is wearing!please tell me.I can never find the color...
Post a Comment